Solution to drawer calculator issues Part 1 (Individual Subassemblies)
I know there is a different thread asking for ideas for solving some drawer calculator issues, however I thought it best to make a new post to suggest some in depth solutions I have made.
Before I start, I should say that most of this won't make sense unless you have a good understanding of the product spreadsheets (edit design data). I highly encourage everyone to invest the time and learn more about how they work.
I have made a drawer bank product that you can have 1-7 drawers in, the top drawer is defaulted to the global top drawer front height. You can change the drawer qty at anytime, and the calculator will always show the correct names in the correct order. Here is an example of the calculator when it is set to three drawers bank: 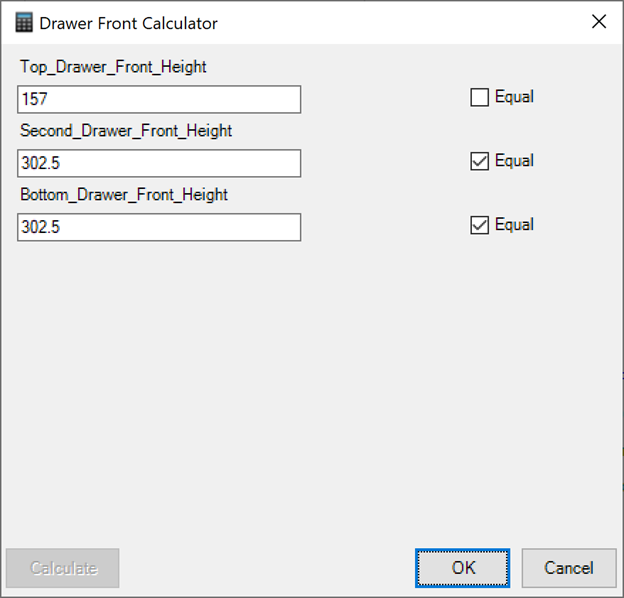
And here is an example of when it is a 4 drawer bank:
All I changed was the drawer Qty. and the calculator was defaulted to still equal the bottom three drawer fronts.
Now, there are two different possible ways of doing this depending if your product has individual drawer box and face subassemblies or a Component Drawer subassembly. I will discuss Individual Drawer box and Finished Face Subassemblies in this post and Component Drawer Subassembly in a Part 2 Post, as this is a lengthy explanation.
To start, it is important to understand why the drawer subassemblies work the way they do. I know the Microvellum developers get a lot of heat from users about the way the drawers work, however I would say if you truly understand the spreadsheets and how the data structures work together, than it is revealed how flexible and well thought out it really is. The bottom drawer is special, it needs to act differently than the others because it needs to account for overlaying the cabinet bottom, and raising the drawer box in relation to drawer face, to name a couple things. So if the drawer Qty. is more than 1, the bottom drawer box and face are always on. The "Second" drawer is only on if there are 3 or more drawers, etc. This is why when people try changing drawer Qty's in cabinets they will often get a large gap between drawers or drawer fronts that overlap etc. Especially if they have checked or unchecked the "Equal" box in the calculators.
This picture is a result of having a standard 3 drawer bank with the bottom 2 drawer front equal sizes and the top front equal to 157mm, and then changing the drawer Qty. to 2.
Now the calculator looks like this:
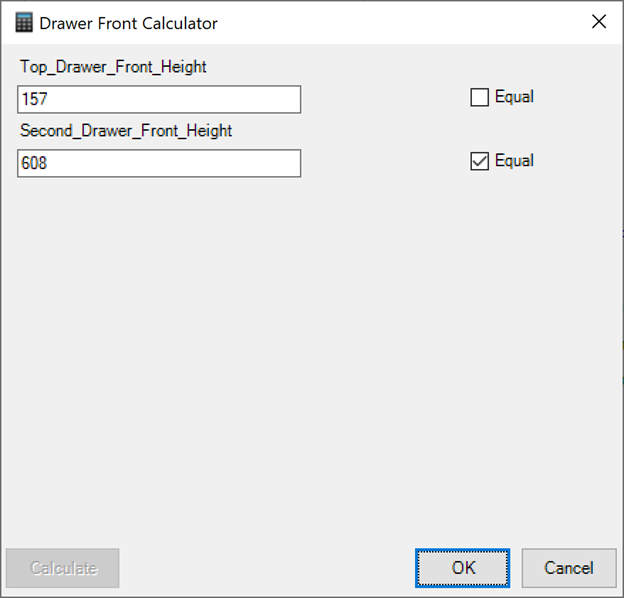
Notice how the "Second_Drawer_Front_Height" of 608mm clearly isn't reflected in how tall the bottom drawer front height of the picture above is. 608mm is actually the correct height, but the product is pulling the value for the actual bottom drawer front height from the "Bottom_Drawer_Front_Height", even though it isn't visible in the calculator, instead of from the shown "Second_Drawer_Front_Height".
Fixing this is actually quite simple. Here is how to do it on a drawer bank with individual drawer box and finished face subassemblies. I would recommend you do this in the 7 Drawer Bank, that way you will have the option to have up to 7 drawers.
We want to make the "Bottom_Drawer_Front_Height" (that is not shown) actually equal what the "Second_Drawer_Front_Height" is if there are just two drawers. (and equal the third drawer front height when there are 3 drawers, etc.) We just need to go into he Subassembly tab in the spreadsheet of the product, and find our "Finished Faces" subassembly row that is the subassembly for the BOTTOM drawer front.
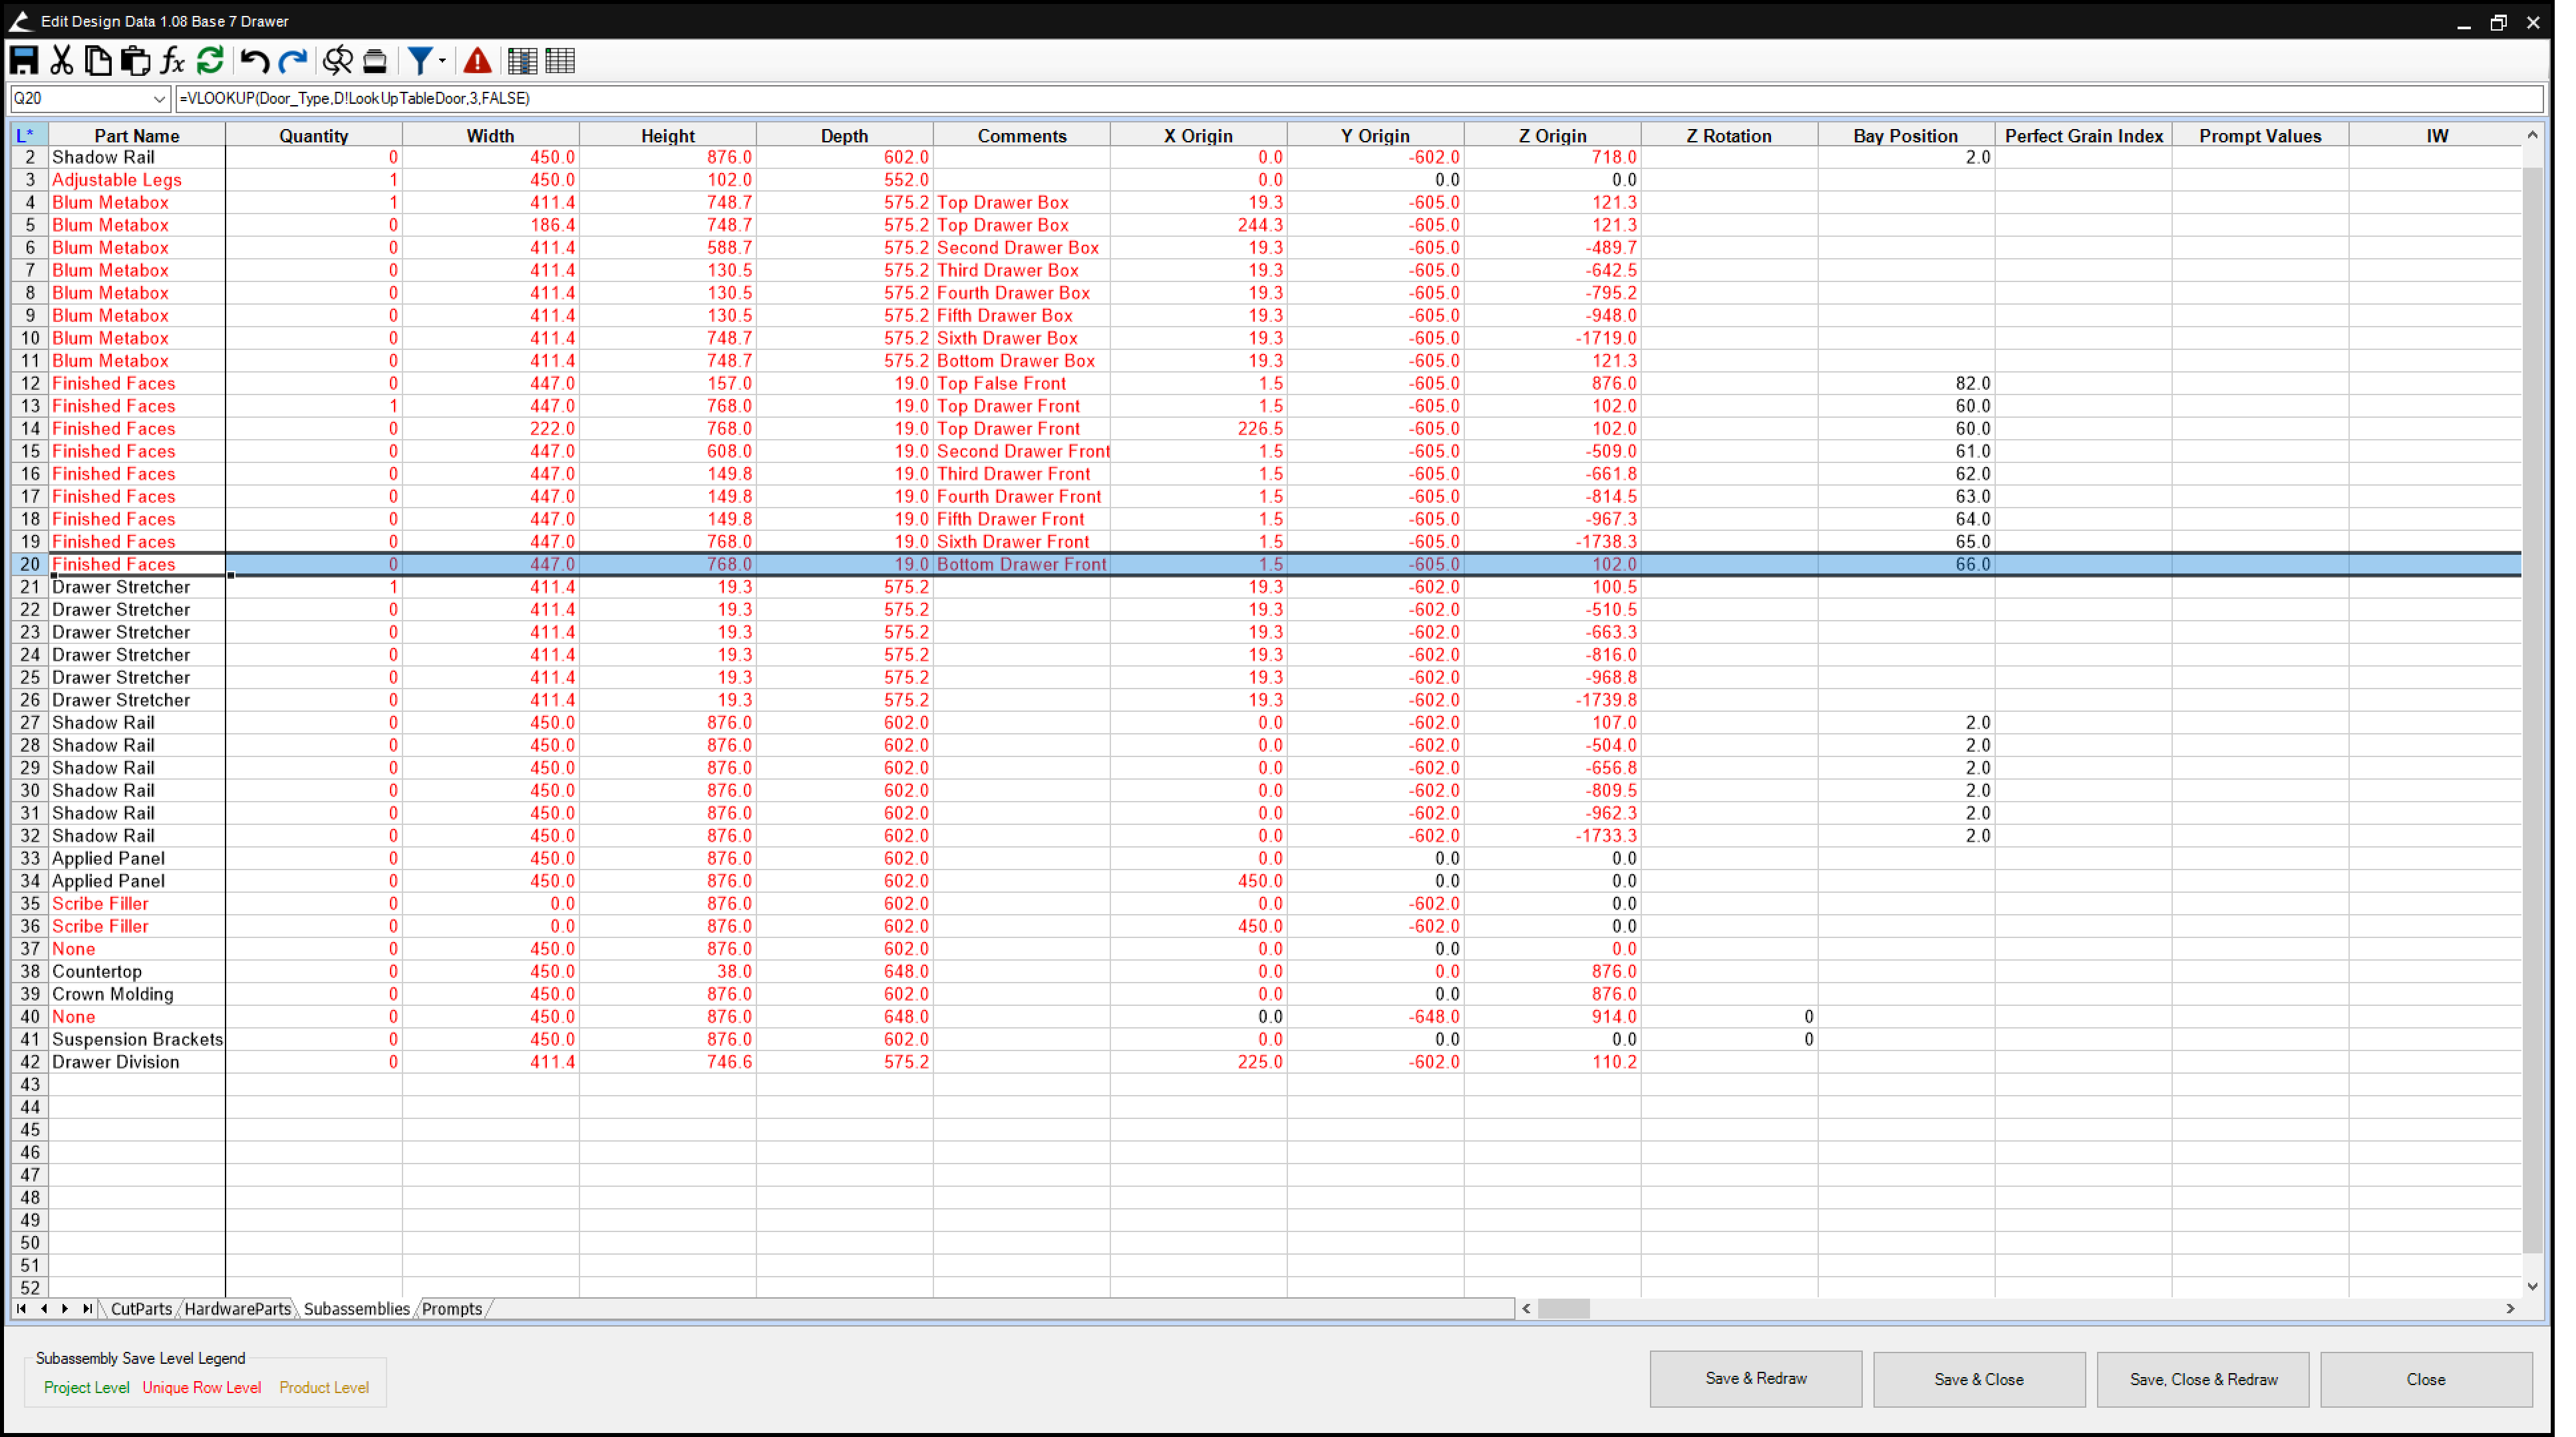
The "Height" cell for the Bottom "Finished Faces" Drawer Front may have a long formula in it, and my differ from company to company already. You can try this first, just paste this formula in its place:
=IF(Drawer_Qty=2,Second_Drawer_Front_Height,IF(Drawer_Qty=3,Third_Drawer_Front_Height,IF(Drawer_Qty=4,Fourth_Drawer_Front_Height,IF(Drawer_Qty=5,Fifth_Drawer_Front_Height,IF(Drawer_Qty=6,Sixth_Drawer_Front_Height,Bottom_Drawer_Front_Height)))))
Or you can just replace the spot in the existing formula that would return the value of "Bottom_Drawer_Front_Height" with the formula above.
Now go into your Prompts tab, find the "Drawer Qty" Prompt and set the control type to 5, set the Control Type Data cell to: 1|2|3|4|5|6|7 and make sure that the Hide Prompt cell is either blank or 0. You can set the Tab Index to show this prompt on whatever tab you would like in your Product Prompts menu ("0" for Main).
You may also have to move the prompt "Drawer Qty" to make sure it is above the first blank row in the prompt screen, or else it won't be visible no matter what you do. The safest way to do that is find the first blank row, select the whole row (by clicking on the row number), right click, insert, make sure Shift Down is selected, then hit OK. Now Select the whole row for the "Drawer Qty" Prompt (by clicking on the row number), right click, CUT, click on the new blank row directly under the first list of prompts, right click, PASTE.
it should look something like this:
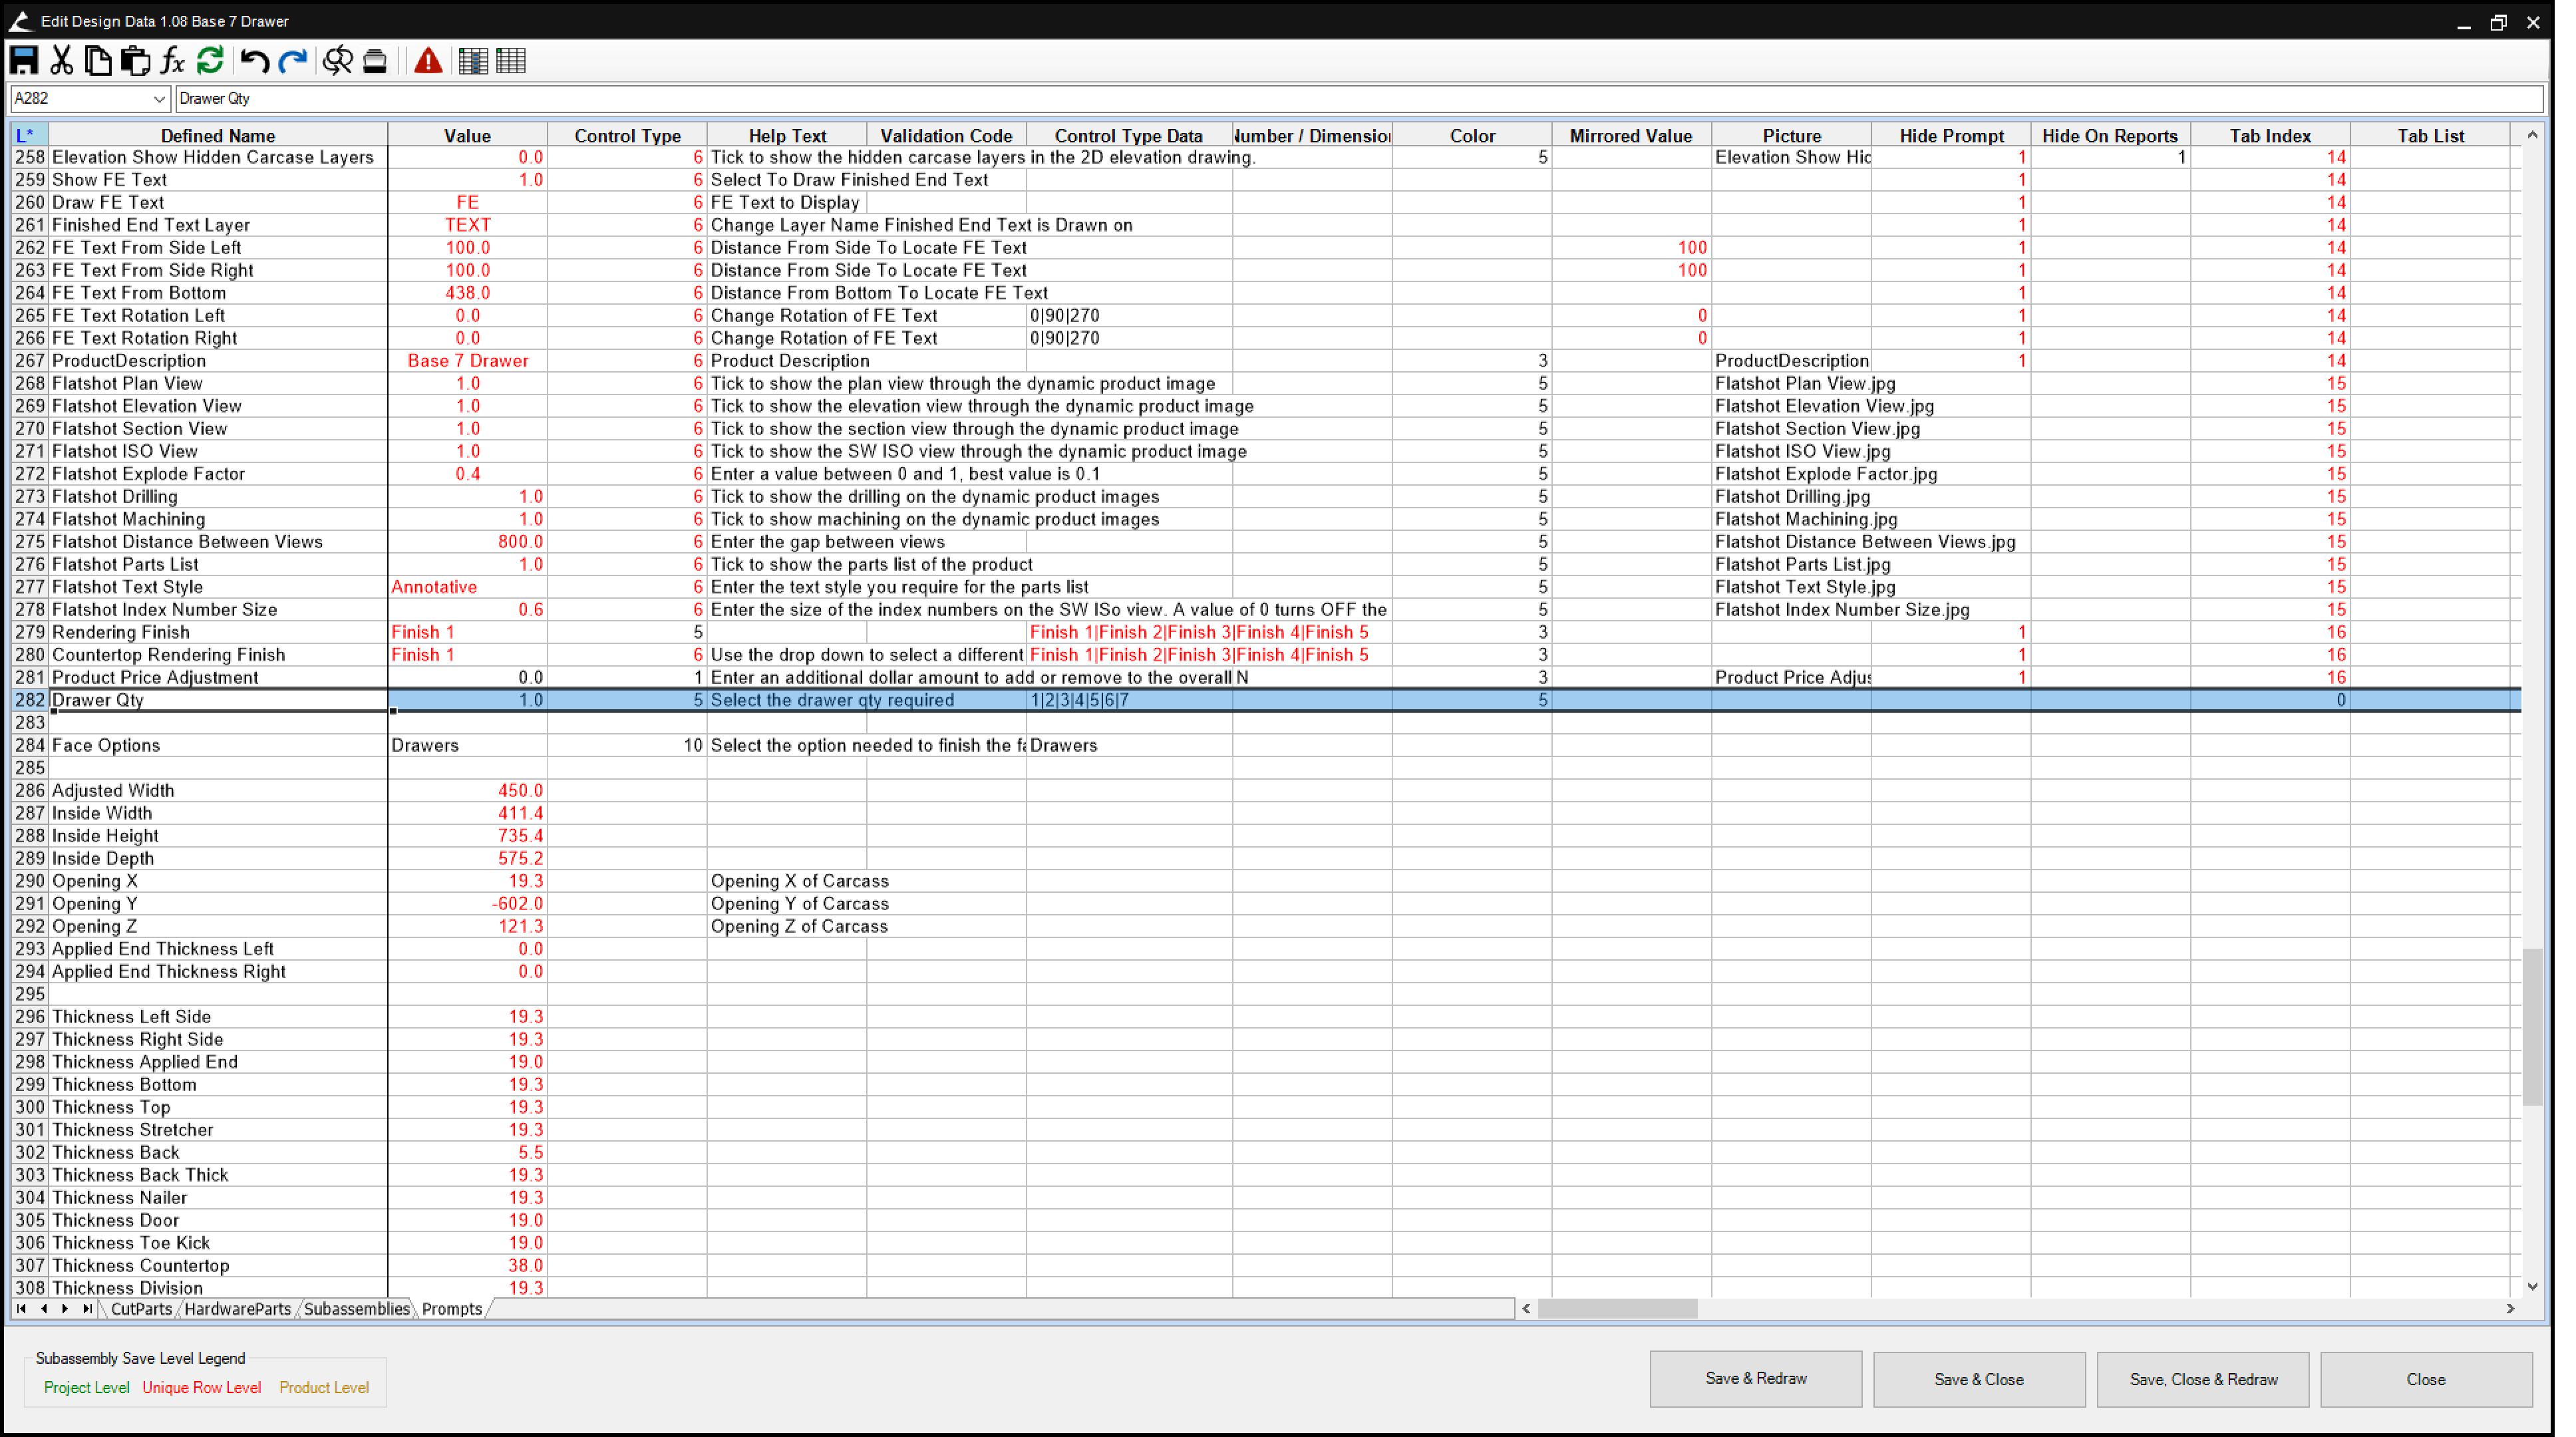
Make sure the cell is still defined.
Go to the "Top_Drawer_Front_Height" Prompt and make its Value cell "=G!Default_Top_Drawer_Front_Height" Calculator Index cell "0"
Make all the rest of the Second, Third, etc, front height's Calculator index to "0.1"
Shown here: 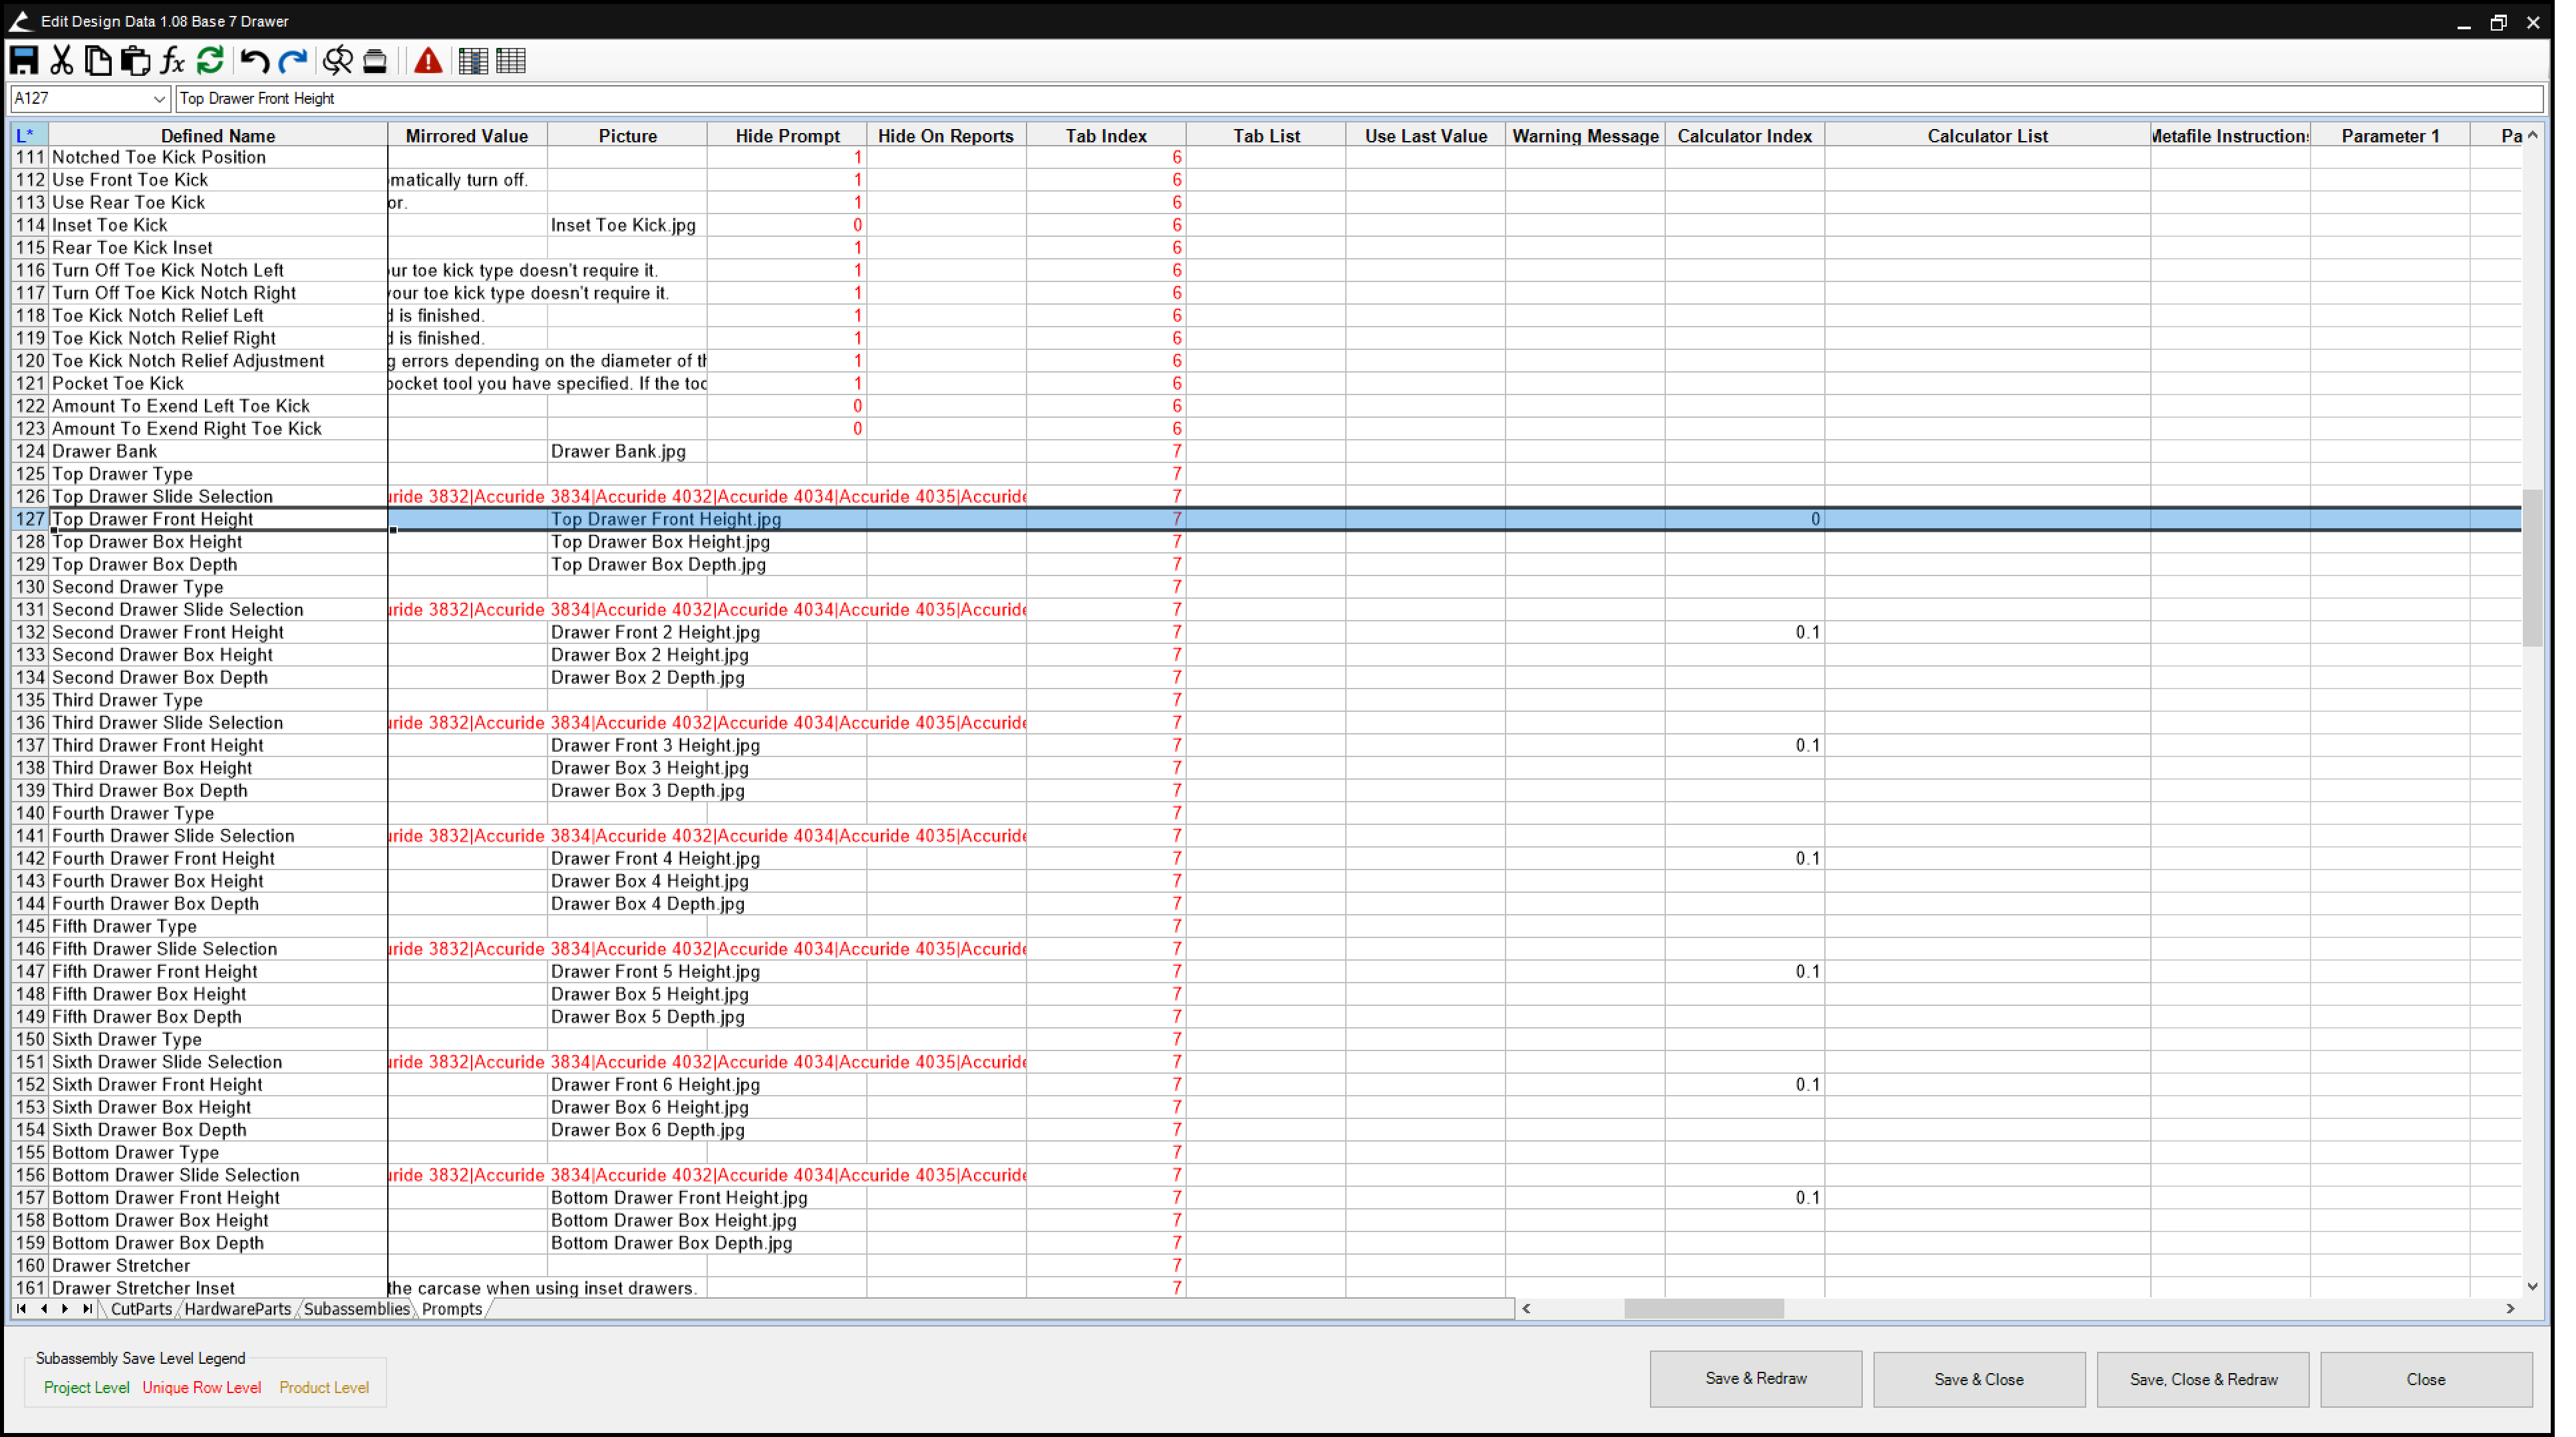
Now Save,Close,and Redraw.
I would save this product as a new product to you library to save your progress and not to overwrite your current products.
Test out the Drawer Bank with different drawer quantities and try out the calculator.
It is likely that if you set it to 1 drawer you will run into some other issues with the drawer stretcher and maybe some other things, you'll have to fix those yourself by referencing the 1 Drawer product.
You will notice that in the calculator, for example a 3 Drawer, your calculator won't list "Bottom_Drawer_Front_Height" like in my pictures at the top, it will list "Third_Drawer_Front_Height". This is not an issue as far as the product working is concerned. And changing this displayed name is a little more complex and could cause more harm than good if you are not 100% confident in you abilities. I would say not to worry about this at all, just remember that furthest down listed name in the calculator is actually the bottom drawer subassemblies. If you are dead set on making it say "Bottom_Drawer_Front_Height", then I suggest you explore and experiment as I did, and If you can figure it out then you will also under stand it enough know the risks.
Hopefully this works at this point, however if your product is already very customized and my instructions do not line up exactly with your product, you will have to take the concepts I have laid out here and apply them in your own way to make it work.
If none of this made sense, I again encourage you to dive deep into learning the spreadsheets. This is only the tip of the iceberg in terms of what I have discovered is possible, even for concepts I haven't seen mentioned in any community posts. You can do it, own your data!
See Part 2 for Component Drawer Subassembly fix. (may not be posted at your time of reading, I have to make time to write it out)
Topic Participants
Jesse Neven
Mike
MVU eLearning
Grow Your Knowledge
Follow along with RJ as he takes you on a journey to build your foundational knowledge of Toolbox.
Follow us on: