Overview: Printing Labels
Use the menu items available in the Labels dropdown menu, in the Processing Center, to print labels for products and parts.
Setting the Current Label
It is possible to have multiple labels set up with different sets of information and then switch between those labels before they are printed. You can see which label is going to be printed by using the Current Product Label and Current Part Label menu items. Each menu item will list all of the labels and allow you to select the one you want to use as the current label. The current label will be shown with a checkmark next to the label name.
Selecting the label will assign it as the default label to print.
Printing Product Labels
Once a work order has been created, you can print the product labels for the products inside the work order. Selecting the Product Labels menu item from the Labels dropdown menu will allow you to do a print preview, displaying the report preview window, or you can send the product labels directly to a printer.
Printing Part Labels
Use the print labels fly-out to select the type of labels you would like to print and the method of printing the labels.
Printing Nest Labels

If you have processed any parts in a work order with a Nesting processing station, you can print nesting part labels from the Labels dropdown menu. After selecting the Nest Labels menu item, a fly-out with three printing methods will be available, Show Patterns, Print Preview, and Make Metafiles of Part Labels.
Show Patterns Method
Selecting the Show Patterns button will display the Nesting Results screen. In the top right corner is the pattern list. Select a pattern from the list to display a visual representation of the nested sheet and populate the parts list below the pattern list. Select a part picture or the parts list entry to enable the printing controls located at the bottom of the screen. You have the option to print just the select part by selecting the Print One button, or you can print the entire pattern by selecting the Print Pattern button. The picture of the parts will change color based on different actions taken.

Part Colors in Optimization Results Screen
White = Part is not selected and hasn't been printed.
Green = Part is selected but hasn't been printed.
Red = Part is not selected and has already been printed.
Blue = Part is selected and has been printed.
Click Panel to Print Checkbox Option
If you check the Click Panel to Print checkbox at the bottom of the screen, you can bypass having to select the Print One button when you want to print an individual label. With this option selected, a part label will print once the part is selected on the nested pattern. This is a useful option when using a touchscreen.
Print Preview Method
Selecting the Print Preview menu item for nesting labels will allow you to print all of the nesting part labels for all nested patterns in the work order. The labels will first be displayed in the print preview screen.
Make Metafiles of Part Labels
This menu item is used specifically for newer nesting machines that have the automatic label feature on the machine itself. This command will create metafiles of the part label report and output a .emf file in the work order folder that can be used for these machines.
Printing Microvellum Sawing Labels

If you have processed any parts in a work order with a Microvellum Sawing processing station, you can print sawing optimization part labels form the Labels dropdown menu. After selecting the Microvellum Sawing Labels menu item, a fly-out with two printing methods available, Show Patterns and Print Preview.
Show Patterns Method
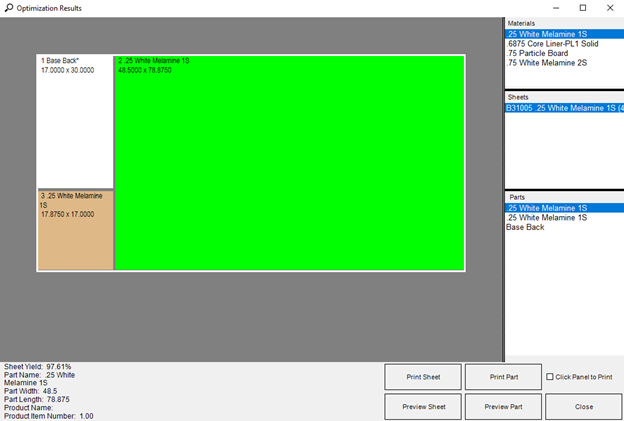
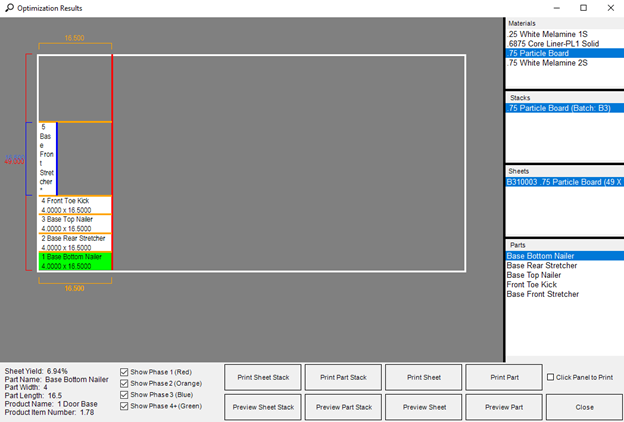
Selecting the Show Patterns button will display the Optimization Results screen. In the top right corner is the pattern list. Select a pattern from the list to display a visual representation of the optimized sheet and populate the parts list below the pattern list. If there are multiple stacks for the selected pattern, the Stacks list will also be populated after selecting a pattern. Select a part picture or the parts list entry to enable the printing controls located at the bottom of the screen. You have the option to print just the select part by selecting the Print One, Print Stack button to print all of the labels for the currently selected stack, or you can print the entire pattern and all of the stacks by selecting the Print Pattern button. The picture of the parts will change color based on different actions taken.

Part Colors in Sawing Optimization Results Screen
White = Part is not selected and hasn't been printed.
Green = Part is selected but hasn't been printed.
Red = Part is not selected and has already been printed.
Blue = Part is selected and has been printed.
Click Panel to Print Checkbox Option
If you check the Click Panel to Print checkbox at the bottom of the screen, you can bypass having to select the Print One button when you want to print an individual label. With this option selected, a part label will print once the part is selected on the nested pattern. This is a useful option when using a touchscreen.
Print Preview Method
Selecting the Print Preview menu item for sawing labels will allow you to print all of the sawing part labels for all of the sawing patterns in the work order. The labels will first be displayed in the print preview screen.
Related Articles
Batch Printing Reports Using Report Groups (Reference)
Introduction This article applies to Microvellum software builds 15.6.2201 and greater and provides a reference for using the Report Groups to batch print selected reports. See Batch Printing Reports Using Report Groups (Overview) in the Microvellum ...Issue: Part Labels Display Incorrect Barcode Data when Processing to Multiple Machines in 15.6
As of build 15.6.221, you now may use the simplified procedure found in the Microvellum Help Center article Processing Station Associates for Reports (Overview) to resolve this issue in addition to the procedure found in this article. Issue : Part ...Auto-Labeling and Creating New G-Code
Microvellum includes the ability to modify the nest drawings by repositioning parts within the nest. This includes moving parts to another location on the same sheet they originally assigned, rotating parts on the sheet they were initially assigned ...Printing Reports and Labels
Printing Reports To print reports, click on the General menu, expand the Reports menu, and select whether you want to print individual reports or report groups. Report Groups can be set up through Toolbox (Toolbox Setup > Design Reports > Setup ...Parts File Processing Station Associates (Overview)
Overview of Processing Station Parts File Associates Microvellum contains complete nesting optimizer and complete sawing optimizer solutions. It also supports third-party optimizers such as Ardis, BlueCell, and CutRite. Microvellum creates a “parts ...
Recent Articles
Microvellum Release Notes | Build 25.2.0206.641
The following release notes apply to Microvellum build 25.2.0206.641. Item Number Fix An issue was reported regarding item numbers in composite drawings. Users who processed work orders with multiple products reported that the item numbers would ...Microvellum Release Notes | Build 25.2.0204.641
The following release notes apply to Microvellum build 25.2.0204.641. Toolbox Brand Retirement As part of Microvellum’s ongoing alignment with the values and catalog of INNERGY, and to improve user experience, clarity, and consistency, we have ...MDF Door Profile Guide
Door Wizard The Door Wizard is a Microvellum feature that enables users to interact with and control the specifics of door related variables, prompts, and available settings. The options available in the door wizard vary depending on the specific ...Microvellum Foundation Library Release Notes | Build 26.0112
Additions In accordance with Microvellum's new subscription changes, all Face Frame Expansion products and subassemblies, as well as the Range Hood Master product have been added to the full library install and library update zips (now included with ...Toolbox Release Notes | Build 25.2.0114.641
The following release notes apply to Toolbox build 25.2.0114.641 Processing Center Message Fix Fig. 1: An error message running in the background of the software. An issue was reported within the Processing Center. When processing an order, there ...