PRESSPULL Command
Dynamically modifies objects by extrusion and offset.
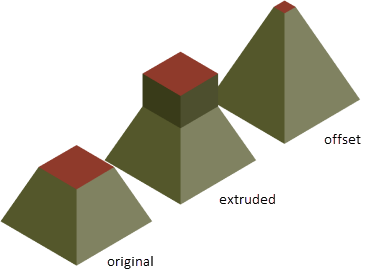
Get visual feedback as you move the cursor after selecting a 2D object, an area formed by a closed boundary or a 3D solid face. The press or pull behavior responds to the type of object you select to create extrusions and offsets. In this example, the area between two polylines is pulled to create a 3D solid wall.
|
Selection
|
Presspull Behavior |
|
Open 2D Object (Such as an Arc)
|
Extrudes to create a surface.
|
|
Closed 2D Object (Such as a Circle)
|
Extrudes to create a 3D solid.
|
|
Inside a Bounded Area
|
Extrudes to create a 3D solid.
|
|
3D Solid Face
|
Offsets the face, expanding or condensing the 3D solid.
|
The command repeats automatically until you press Esc, Enter, or the Spacebar.
The following prompts are displayed:
Object or Bounded Area
Select the object, bounded area, or 3D solid face that you want to modify.
Selecting a face extrudes the face without affecting the adjacent faces. If you Ctrl + Click a face, the face is offset, and the change also affects the adjacent faces.

Multiple
Specifies that you want to make more than one selection.
You can also Shift + Click to make multiple selections.
Offset Distance
If you selected the face of a 3D solid, specify the offset by moving the cursor or entering a distance.
Extrusion Height
If you selected a 2D object or clicked inside a closed area, specify an extrusion height by moving the cursor or entering a distance. The extrusion direction of planar objects is normal to planar objects and in the Z direction of the current UCS for non-planar objects.
Powered by AutoCAD®
Related Articles
About Pressing or Pulling Areas, Objects, and Faces
Get visual feedback as you extrude closed objects and areas, and offset or extrude 3D solid faces. The program responds differently, depending on the type of object or subobject you select to press or pull. Closed objects or bounded areas create 3D ...AutoCAD Keyboard Commands
Learning how to use AutoCAD keyboard commands can help you work faster and improve your efficiency. This article lists the abbreviated commands that can be used in AutoCAD (Toolbox). Toggle General Features Ctrl+G Toggle Grid Ctrl+E Cycle isometric ...To Work with Pressing or Pulling Bounded Areas or Objects
How to create holes and objects by pressing and pulling. For best results, set your drawing to an isometric view before doing a press or pull operation. Push a Hole into a 3D Solid Create a circle or other closed shape on the surface of a 3D solid ...3DPOLY Command
Creates a 3D polyline. A 3D polyline is a connected sequence of straight line segments created as a single object. 3D polylines can be non-coplanar; however, they cannot include arc segments. The following prompts are displayed: Start Point of ...ACTBASEPOINT Command
Inserts a base point or base point prompt in an action macro. As you record an action macro, you can use this command to insert a prompt for base point input. During playback, the macro pauses to display the prompt and does not continue until a ...
Recent Articles
Microvellum Release Notes | Build 25.2.0206.641
The following release notes apply to Microvellum build 25.2.0206.641. Item Number Fix An issue was reported regarding item numbers in composite drawings. Users who processed work orders with multiple products reported that the item numbers would ...Microvellum Release Notes | Build 25.2.0204.641
The following release notes apply to Microvellum build 25.2.0204.641. Toolbox Brand Retirement As part of Microvellum’s ongoing alignment with the values and catalog of INNERGY, and to improve user experience, clarity, and consistency, we have ...MDF Door Profile Guide
Door Wizard The Door Wizard is a Microvellum feature that enables users to interact with and control the specifics of door related variables, prompts, and available settings. The options available in the door wizard vary depending on the specific ...Microvellum Foundation Library Release Notes | Build 26.0112
Additions In accordance with Microvellum's new subscription changes, all Face Frame Expansion products and subassemblies, as well as the Range Hood Master product have been added to the full library install and library update zips (now included with ...Toolbox Release Notes | Build 25.2.0114.641
The following release notes apply to Toolbox build 25.2.0114.641 Processing Center Message Fix Fig. 1: An error message running in the background of the software. An issue was reported within the Processing Center. When processing an order, there ...